Introduction
Template Literals which were introduced in ECMA2015 also known as ES6, has changed the way we write Javascript.
They come with a lot of features such as:
- Multiline strings: A string can span more than one line
- String interpolation: JavaScript variables and expressions can be passed directly into the string
- Easy creation of HTML fragments
- Nested template literals
Let's now look at template literals in detail.
Syntax
Normal strings use a single quote(') or a double quote("):
const str = "normal string";
Template literals use enclosing back-tick (`) characters.
The back-tick can be found on the top left corner of your keyboard. Usually below the Esc key, or above the Tab key.
const str = `using back-ticks`;
Multiline Strings
Before template literals, to create multi-line strings, we had to pass a new line character(\n).
Normal strings:
const multiline = "line one \n line two";
With template literals, we can write a new line by pressing the enter key without using any special characters like \n:
const multiline = `line one
line two`;
White Space in Template Literals
Template literals preserve leading white space. This means that white space inside a template literal will be display as-is.
const multiline = `
line one
                   line two
               line 3
            line 4`;
Here's the output:
Outputline one
                   line two
               line 3
            line 4
As you can see white space is displayed the same way it was entered into the template literal.
To avoid awkward white spaces issues, always be mindful of white spaces when creating multi-line strings:
const multiline = `
line one
line two
line 3
line 4`;
Output:
Outputline one
line two
line 3
line 4
String Interpolation
Before ES6, we could embed an expression with a string using the + operator.
const name = "stanley";
const myString = "My name is " + name;
This will output, My name is stanley.
With template literals, we can accomplish the same thing through string interpolation.
String interpolation is a process where you can pass a valid JavaScript expression such as a variable into a template literal. The expression inside ${} is evaluated, and the result of the evaluation is embedded into the string as demonstrated in the example below:
const name = "stanley";
const myString = `My name is ${name}`;
Output:
OutputMy name is stanley
We are not limited to only interpolating variables. We can pass any valid Javascript expression like in the following examples.
Example 1:
const myString = `I am ${20 + 3} years old`;

console.log(myString); // I am 23 years old
Example 2:
const num1 = 20;
const num2 = 3;
const myString = `I am ${num1 + num2} years old`;

console.log(myString); // I am 23 years old
We can also call a function inside ${}:
function capitalize(value) {
  return value.toUpperCase();
}
const name = "stanley";
const myString = `my name is ${capitalize(name)}`;
Output:
Outputmy name is STANLEY
Html Fragments
Template literals allow us to create HTML fragments easily. This works well because of their good support for multi-line strings.
Before ES6, to generate multi-line HTML code, we had to jump through hoops by using string concatenation and passing in new line characters.
We can see how we used to do it with our example which displays a person's information:
const person = {
  name: "Stanley",
  age: 23,
};
Accessing the data and displaying in HTML code with normal strings:
const htmlMarkup =
  "<div class='person'>" +
  "<h2>Person Details</h2>" +
  "<p>My name is " +
  person.name +
  "</p>" +
  "<p> I am " +
  person.age +
  " years old</p>" +
  "</div>";

element.innerHTML = htmlMarkup;
Template Literals:
const htmlMarkup = `
 <div class='person'>
 <h2>Person Details</h2>
 <p>My name is ${person.name} </p>
 <p>I am ${person.age} years old</p>
 </div>
 `;

element.innerHTML = htmlMarkup;
As you can see, the HTML markup with template literals is nice and clear. We can easily modify the code without worry about messing up concatenation.
Nested Template Literals
One of the most interesting and useful features of template literals is nesting.
We can nest a template literal inside another template literal.
We will use a practical example where we will display a list of a person's favorite movies from an array.
const person = {
  name: "Stanley",
  age: 23,
  favoriteMovies: ["Terminator 2", "Dunkirk", "Thor 3", "Jungle Book"],
};
Nested Template Literal:
const htmlMarkup = `
 <div class="person">
 <h2> ${person.name} favorite movies are: </h2>
 <ul>
 ${person.favoriteMovies.map((movie) => `<li>${movie}</li>`).join("")}
 </ul>
`;

element.innerHTML = htmlMarkup;
In our example, we are nesting a template literal inside another one.
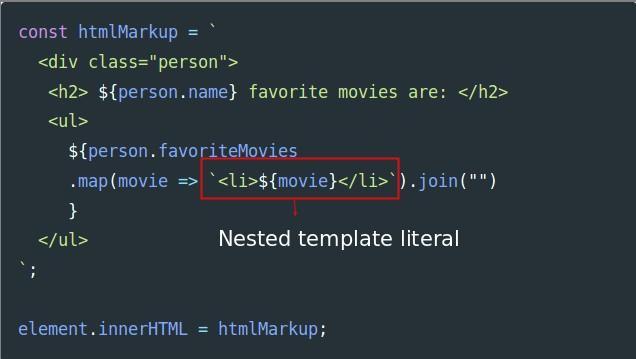
By the way, if you are new to JavaScript and you were confused with this syntax:
${person.favoriteMovies
.map(movie => `<li>${movie}</li>`).join("")
}
We are using the map() method to loop though each element in the person.favoriteMovies array, and return an HTML list item of every element.
The map() method takes an anonymous function. And we have passed it an anonymous arrow function. If you don't know about arrow functions, you can learn more about them here: An introduction to Arrow Functions and Lexical ‘this’
Conclusion
Hopefully, this article has helped you understand the benefits of using template literals in ES6 and most importantly, how to write them.
If you have any questions or insights, feel free to leave a comment.